How to Install WordPress Locally on Windows PC
How to Install WordPress Locally on Windows PC
XAMPP is a free and open-source tool that is mostly used to create a local copy of the site on your computer for testing purposes. This is a lightweight and cross-platform application that makes it quite simple for web developers to test its plugins, themes, and other things. XAMPP comes with Apache and MySQL which are the two main mechanisms for its installation. Apache is used to create a local server while you can use MySQL to manage or save data on a local server for the website.
Step 1: Download and install XAMPP on your computer
Firstly, download the latest version of XAMPP from Apache Friends. Its file size about 110 MB so, it might take a minute or so depending on your connection. Open your web browser and head over to the Apache Friends downloads page. On the next page, download the respective version for your PC.

Once it gets downloaded, navigate to the download folder of File Explorer and launch the XAMPP installer. If you’re running antivirus software, you might get a warning like this:

Click on “Yes” to continue the installation.
If User Account Control prompts on the screen, click on the “Yes” button to give your permission.
During this, a warning message may come to appear. Click on the “OK” button, it opens the XAMPP Setup Wizard on the screen. Then hit the “Next” button to proceed.

On the next screen, there are a variety of components that you need to select for the installation process.
To install XAMPP and WordPress, you do not need all of the components. In addition to the required components, all you need are:
- MySQL
- PHPMyAdmin

Again, these options are essential to run the software, therefore leave it as it is and click on the “Next” button.
Now select the folder location where you want to install the XAMPP files. I always leave it as the default:

On the next screen, you will get a prompt asking you to install Bitnami for XAMPP Page, just Click the “Next” button. In case you want to know about Bitnami, then select the checkbox next to Learn more about Bitnami for XAMPP or you don’t need this to install XAMPP and WordPress, So just uncheck the box.
I uncheck this box:

Now the setup is ready to start the installation process on your device, so again click the Next button to proceed.

Now, wait for a while until it completes the installation.

After the proper installation, you will be prompted with a window asking you “Do you want to start the Control Panel now?”.
Select the checkbox and click on the Finish button.

Step 2: Start the modules and test your server
To configure the XAMPP, you may need to run the XAMPP application as an administrator.
So, click on the Start button and type XAMPP.
Doing this, the “XAMPP Control Panel” starts appearing in the best match. Now right-click on it and select Run as administrator. If User Account Control (UAC) asks you for permission, click on the Yes button.
When the XAMPP Control Panel opens, you will see a list of web services under the Module section.
Here you first have to activate the Apache and MySQL services by clicking on the respective Start button that is available under the Actions section.

As soon as you click on the Start button, the PID and the Port number of the corresponding services become visible. Also, the respective services under the Module section turn out green.

Now you should be able to test that your local server. Go to http://localhost/ in your web browser of choice:

That’s it. I hope after reading this guide, it has now become pretty easy for you to install and configure the XAMPP on your PC.
Step 3: Download WordPress & Creating a Website Folder:
Download and unpack the latest version of WordPress to Go to https://wordpress.org/ official page.
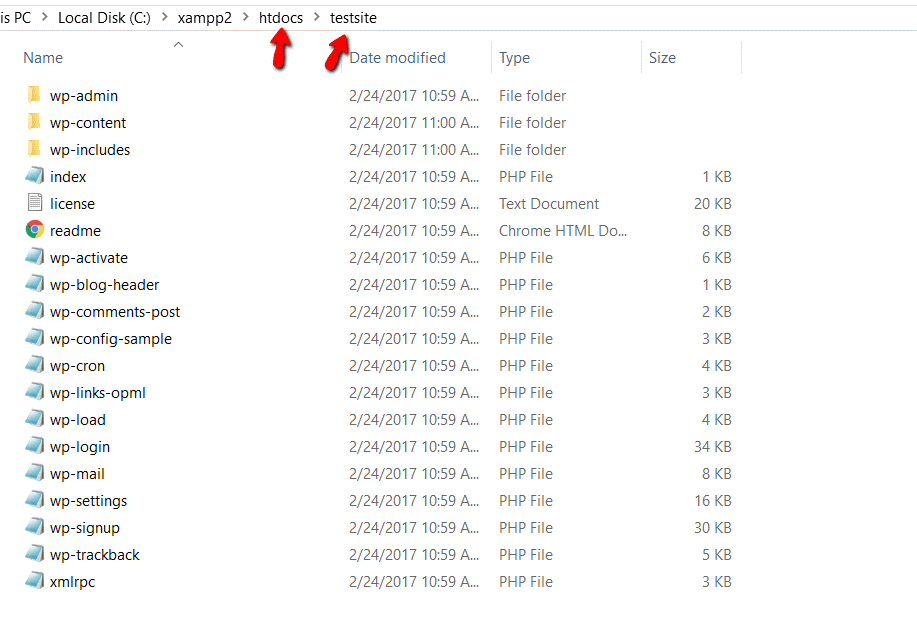
Then, in Windows, navigate to the folder where you installed XAMPP. For me, that’s C://xampp. Then, in that folder, find the htdocs subfolder and create a new folder with a name you want to give to your site (here I’m creating “testsite”).

One created copy those unpacked WordPress Files under this folder.

Step 4: Create a database for WordPress
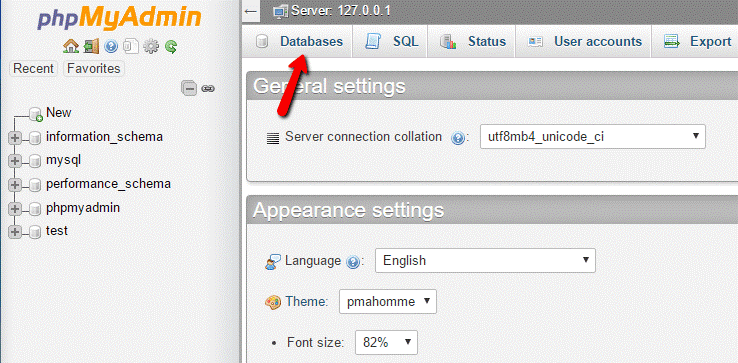
It’s now time to create a MySQL database to use with WordPress, to do that go to the phpMyAdmin panel from XAMPP control panel by clicking the “Admin” button under MySQL.

Click on “Databases” at the top:

Enter the name of the Database and Click “Create” button.

Step 5: Install WordPress locally via the on-screen installer
Run the WordPress Installation by opening a browser and type the desired URL. i.e.- http://localhost/<folder_name>
Your WordPress installation start.

Step 6: Provide WordPress Database Information:
In this screen, you need to enter all the information you already have, such as Database name, database username, database password, database hostname, and table prefix. Then click “Submit”.

Then finish the rest of the WordPress install process like normal.
Click on the “Log In” button to log in to your site and enjoy!
Conclusion:
How to Install WordPress Locally on Windows PC
Installing WordPress on a local server is easy you need a XAMPP or WAMP server or any other local server based on the operating system that you are using.
You can create multiple websites on a local server and can migrate to the live server once the website is completed.
XAMPP server makes it easy to develop WordPress websites on a local server.
Do you prefer to use XAMPP, WAMP, or MAMP server for your website development?
Fixing a Blocked Port in XAMPP
You’re trying to use XAMPP to do PHP development. But when you start Apache, you get this error. The chances are that it’s due to a blocked port. In this video, I’ll show you how to fix that error by changing the port that Apache uses. Below the video, I provide text instructions.
How to fix a Blocked Port in XAMPP
The error you’re getting probably reads something like this:

The chances are the error is due to a blocked port and that’s almost definitely port 80. One option would be to find the application that is using port 80 (probably Skype) and change it to use some other port. But you may not have control of that. In that case, you can change Apache to use a different port. Here’s how:
- In the XAMPP Control panel, click on Config:

2.Change the editor to something better than Notepad. I use TextPad:

3. Click on Config by Apache and select httpd.conf:

4. Find “Listen 80” and change it to “Listen 8080”.
5. Find “ServerName localhost:80” and change it to “ServerName localhost:8080”.
6. If you’re also running SSL, you’ll need to change httpd-ssl.conf:

7. Find “Listen 443” and change it to “Listen 4433”.
8. Find “<VirtualHost _default_:443>” and change it to “<VirtualHost _default_:4443>”.
9. Find “ServerName localhost:443”. It’s possible that this hasn’t been set up yet and it reads “ServerName www.example.com:443”. In any case, change it to “ServerName localhost:4443”.
10. In the Control Panel, click on the main Config button again.
11. Click on Service and Port Settings and change the Main Port to 8080 and the SSL Port 4433.
12. Close out of Configuration or Stop and Start Apache.
13. Click the Admin button by Apache and it should open up the XAMPP home page in your browser.
I hope that helps! 🙂

![You are currently viewing How to Install WordPress Locally on Windows PC [2020]](https://magicwithwp.com/wp-content/uploads/2020/05/XAMPP-Apache-1-scaled.jpg)

